The see saw gourds
Or, “The story of the bamboo teeter tottering loofas”….
Last year I built a bamboo tower to showcase the birdhouse bottle gourd vines that would soon be taking over my back fence.
If you don’t recall how that worked for me, you can refresh your memory here: OOPS
I was smarter than that this year; I left the bamboo leaning against the fence safely out of the reach of this year’s “luffa” gourd vines. Or so I thought…..
The other day I was admiring the fine bunch of gourds that had secured themselves behind my tomato cage storage area:

The bamboo from last year’s tower was leaning on the fence to the right of this bunch, “safely out of the reach” of the vines. I had noticed that a spur had taken off up the bamboo a few weeks earlier but wasn’t concerned since the bamboo was leaning against the fence, and my mighty fence sure wouldn’t topple over.
After I took this picture, I realized something had changed- something I was used to seeing recently wasn’t in view any more. At this point I noticed the someone had taken some of my longer bamboo, moved it outside of the fence and then leaned it back onto the fence exactly opposite of where it had been a day or two earlier. The picture below clearly shows this- some prankster was messing with me:

I wasn’t happy. I stormed out around to the back and had to stop and laugh when I saw this:

DOH!
How many luffas had taken roost up in the top of the bamboo?
The answer was “a lot”:

I can only imagine how I would have reacted if I was standing there when it happened; I could even picture a slapstick scene where I was launched though the air over the asparagus patch.
I forget that these things are still heavy like giant zucchinis; I keep waiting for some to start to brown and dry but I guess it isn’t happening until after Thanksgiving…..
This winter’s “high tunnel” experiment begins
We’ve had something fresh to harvest & eat from the garden continuously during each of the last 12 months; last fall’s garden transitioned into a moderately successful winter garden thanks to the cover I provided during the cold stretches. My experiment last year was to cover three beds individually with contractor’s plastic using pvc ribs; the “hoop-house” posts are here and a sample picture o the first one is below:

Technically the structures were more “low tunnels” than hoop houses. They worked OK but all the covering, uncovering, and maintaining supplementary heat(shop lights) in each was a lot of work.
This year my scheme is to try and cover all 3 beds with one structure and then set up an automatic venting mechanism to reduce the hassle of temperature control. I may set up supplementary heat of some sort if time and cheap-arsed ingenuity permit.
The 1/2″ pvc used in the low tunnels last year won’t suffice as it isn’t rigid enough. After investigating all sorts of materials for the ribs I decided that 1″ PVC would suffice if cross bracing was utilized. I played with pi to try and figure out the minimum width of greenhouse overwintering plastic I needed to order and ended up with a calculated 24′ as my width. Basically I needed to know what the length of the arch would be when straightened out; it had to be long enough to not only cover all three beds (min footprint of 15 ft) but also “bowed” enough to provide sufficient height.
The height is important for several reasons-
- I will need sufficient headroom to accommodate a relatively short gardener (me) while working in the structure.
- More headroom equals more slope for better water/snow shedding.
- More headroom = more volume = more consistent temperature control for the entire setup.
The 24′ lengths of pvc gave a good 7′ of headroom in the center and plenty of room down each “aisle” between the beds. I will space them 4′ or 5’apart (6 or 5 ribs) and will end up with a roughly 20′ x 15′ floor area.
I ran a 1/2″ spur from the main well line down to the area of these beds so that the irrigation control box (actually just an underground faucet box for now) will be inside the structure. This will be convenient for both watering and freeze prevention.
The 1″ pvc fits perfectly inside 1 1/4″; I opted to make sleeves out of the 1 1/4″ pipe vs actually joining and gluing the 1″. This allows for easier storage (can be disassembled and stashed in maximum 10′ sections for the summer) and the ability to more easily change to “plan B” should plan “A” not be as functional as I am hoping for. (There is no plan B yet; I’ll have to regroup and come up with something if this scheme doesn’t work.
The 1 1/4″ sleeves are 6″ long and I pre-drilled two set screw holes into each one. The screws are very short self tapping machine screws I happened to have in my shop. Once assembled, the joints look like this:

I put 3 ribs up today for evaluation and they seem to be rigid enough. I also wanted to get the perspective on what sort of profile I would see when this structure is complete. It is less obtrusive than I was expecting, especially from outside the fence.
The view from the rear:

More to follow as I piece this together….
I guess the season is really over
When we have our first frost advisory…
And when the last tomatoes are pulled (and packed for their transport to the Overhill green tomato pickle factory)…

And when the last 100 peppers are picked…

And when I sit in the grass to get the correct angle to photograph flowers that may be wilted by frost this time tomorrow…


It was a good one.
Rainout: Chimichurri and Cowboy Candy
Technically, it wasn’t raining by the time I was in the garden this evening.
I’m still calling it a rain-out though, since after pulling the last tomato plants (and collecting the green tomatoes) and chatting with a neighbor in the alley (actually inspecting a gun her father left her years ago- a mint 1956 Smith & Wesson 38 Special) it was too dark (and I was too wet) to do much else.
So I decided I would take advantage of the nice crop of Italian flat parsley and try making fresh Chimichurri sauce. I had some in a restaurant in Ft Lauderdale back in August and it was delicious and different enough that I remembered it.
If you haven’t ever tasted one of the hundreds of variations of it, I should warn you that it isn’t something you should consume if you had any ideas of romance for later in the evening, unless of course your significant other had also consumed it. It gave me a significant case of dragon breath; it is definitely the gift that keeps on giving when it comes to “recurring flavor”. On second thought, no romance, even if your significant other has consumed it.
My version was mix of ingredients I had seen listed in one version or another but I can’t say for sure. I think with chimichurri that is the point- it is like Brunswick stew in the South, no two recipes are identical and everyone’s is the best.
- 1 1/2 cups firmly packed fresh parsely
- 1/2 cup firmly packed fresh cilantro
- 2 tablespoons of fresh oregano
- 7 gianormous garlic cloves
- 1/2 teaspoon fresh ground black pepper
- 1 teaspoon red pepper flakes
- 2 teaspoons of kosher salt
- 3/4 cup extra virgin olive oil
- 2 tablespoons white wine vinegar
After a spin or three hundred in the food processor, the result was as one would expect quite “green”. It also didn’t have any trouble depositing aroma to every corner of the house by the time I was done. It had a strong aroma for sure, but I just couldn’t stop bending over the food processor and soaking it all in. (I think I understand for the first time the urge dogs have to roll in something rancid in the yard; it just stinks so good you can’t help it.)

I intend to use this as a marinade for a flank steak or similar cut sometime over the next few days. We’ll see……
Now for the Cowboy Candy bit-
3 or 4 weeks ago I was picking jalapenos with the intention of making (you guessed it) poppers as well as some pepper jelly. While I was in the garden filling a bucket with green meanies, I received an email from my sister linking to a jalapeno recipe that looked much more interesting that jelly: Cowboy Candy (candied jalapenos). The timing of this message was definitely some sort of divine intervention so I proceeded to make a nice batch of this “experiment”.
Well, it had been sitting in the pantry mellowing for almost 4 weeks and I figured tonight was the right time to break the seal on a jar and taste it.
Yum.

Highly

recommended.

And that’s how chimmichurri and cowboy candy became the joint topics of a mostly useless blog post.
9 found bottles + a borrowed welder
= the silliest (documented) results to date “behind cohutt’s fence”.

Mrs cohutt had no idea what I was working on after dinner last night; after I sent a text to her to come see the results she laughed for a full 5 minutes before she clarified that it had her approval. (I think it is a conditional “backyard only” type of approval though).
Don’t worry, it can easily be moved to wherever I can drive a couple of feet of rebar into the ground, so it will soon be looking for a less prominent position behind the fence.
The 9 bottles all are vintage ones that were excavated on site during the great privet removal/fence construction project in the winter of 2009-2010. For almost 2 years they have been lounging on the beech stump in front of my tool shed just waiting for something stupid like this to save them from the dump.
Another picture? Sure, if you insist, one from a slightly higher perspective….

Nature’s Colors
I spent pretty much the entire day outside today racing the season again. Mostly I worked down the list of unglamorous seasonal chores I have been dragging my feet over. I made a lot of progress but it doesn’t make for particularly interesting reading; however the dry air and low sun angle do seem to combine for unusually vibrant colors in odd corners of the garden.
Examples follow:
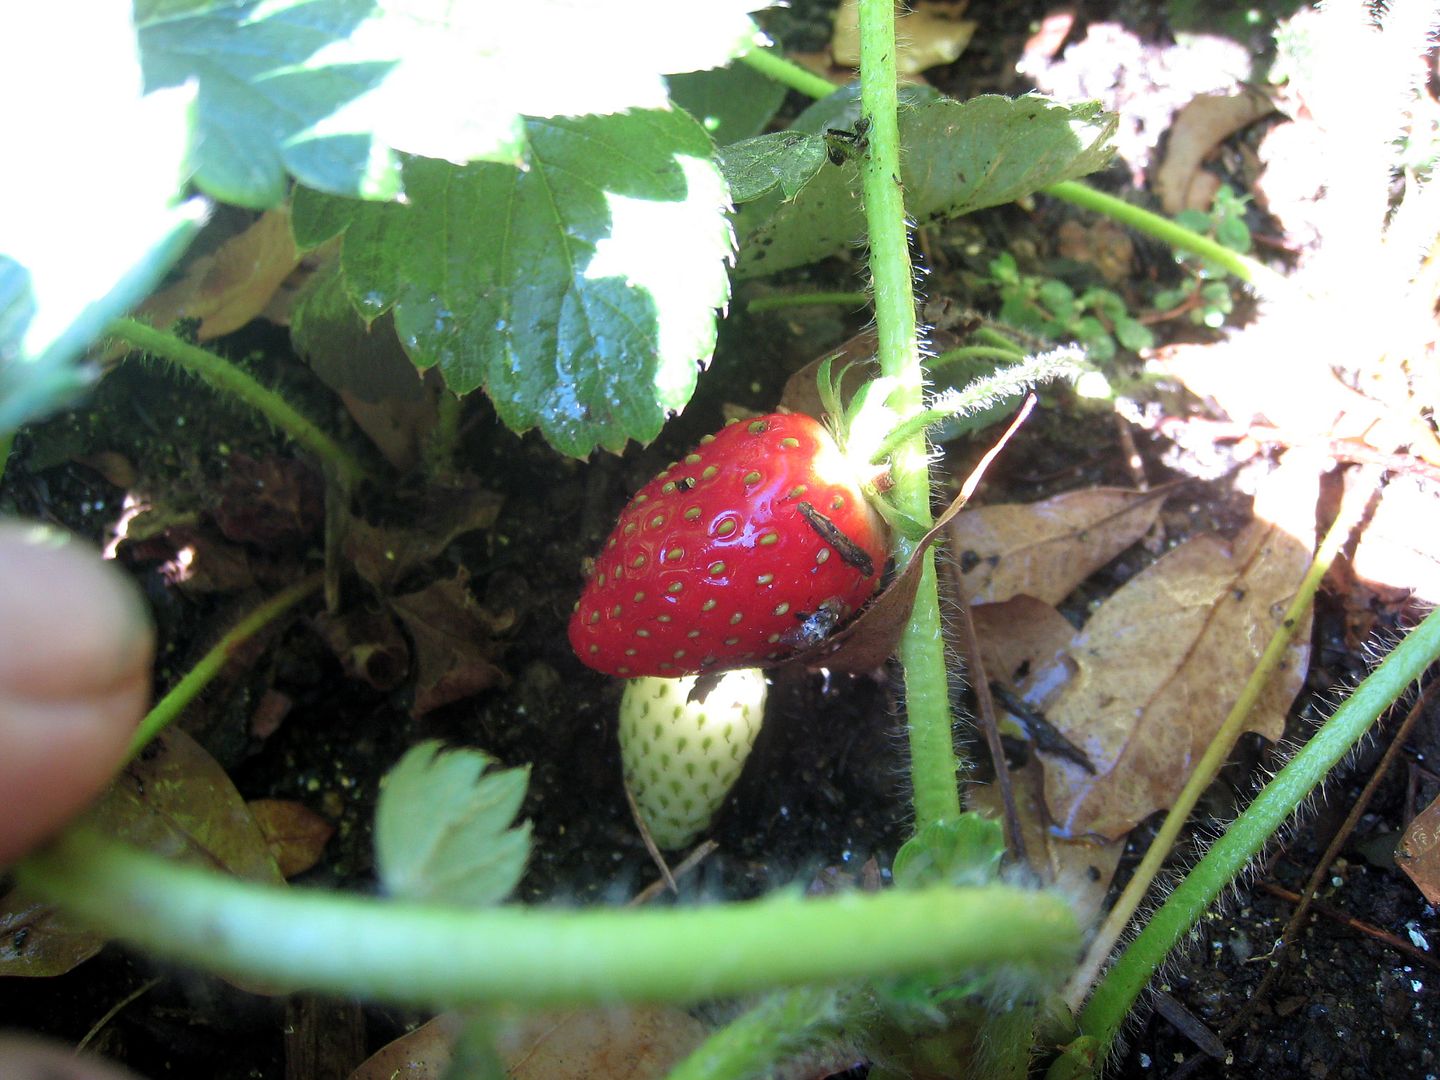
A confused “June bearing” strawberry transplant provided a tiny surprise treat that was so red I spotted it from 30 feet away:
A Thai basil plant in the shade provides a nice lavender/green contrast:

Deep purple, from the same plant ( I have no idea why the thumbnail rotates sideways; the full picture opens normally):

Lippies, Firlots, and Forpets, or what the heck is a peck?
In the early 1800s, Scotland had it all figured out.
A peck was equal to 49 liters of dry measured crops such as peas, wheat and beans.
However, for barley, oats and malt, a peck was only 13 liters. Considering what was made with barley, oats and malt at the time, I think I understand their logic.
Of course 49 liters is a pretty large volume, so a society engaged in such brisk commerce as the Scots would need to have smaller units of measure in order to split pecks. Easy enough- 4 lippies together make a peck. Don’t know what a lippie is? The same measure applied to forpets, so apparently forpets and lippies were interchangeable. I suspect it was bad business to mix lippies and forpets, for example, to make up a peck of 2 lippies and 2 forpets. I don’t have evidence of this, but in an economy that valued the base ingredients of Scotch Whisky 3 1/2 times that of the food staples of the day, I wouldn’t take the chance.
If there were Sam’s Clubs in 1800 Scotland, we would all agree that modest pecks would be insufficient and larger unit of measure would be necessary. Fortunately they would have had firlots; get 4 pecks, you have a firlot. Or 16 lippies. Or 16 forpets.
My suspicion is that the Scots only had these measures in place to confuse the British when trading with them, because the Weights and Measures Act of 1824 forced Scotland to convert to imperial units, and still today a peck is merely 2 gallons or 8 quarts of dry measured volume. (Snore…..)
4 pecks make a bushel and at one point a half bushel was a kenning. Eventually enough people preferred saying “half bushel” over “kenning” (hey buddy you shorted me a kenning. Huh?) that “kenning” fell into obsolescence.
“What’s with all the peck talk” you ask.
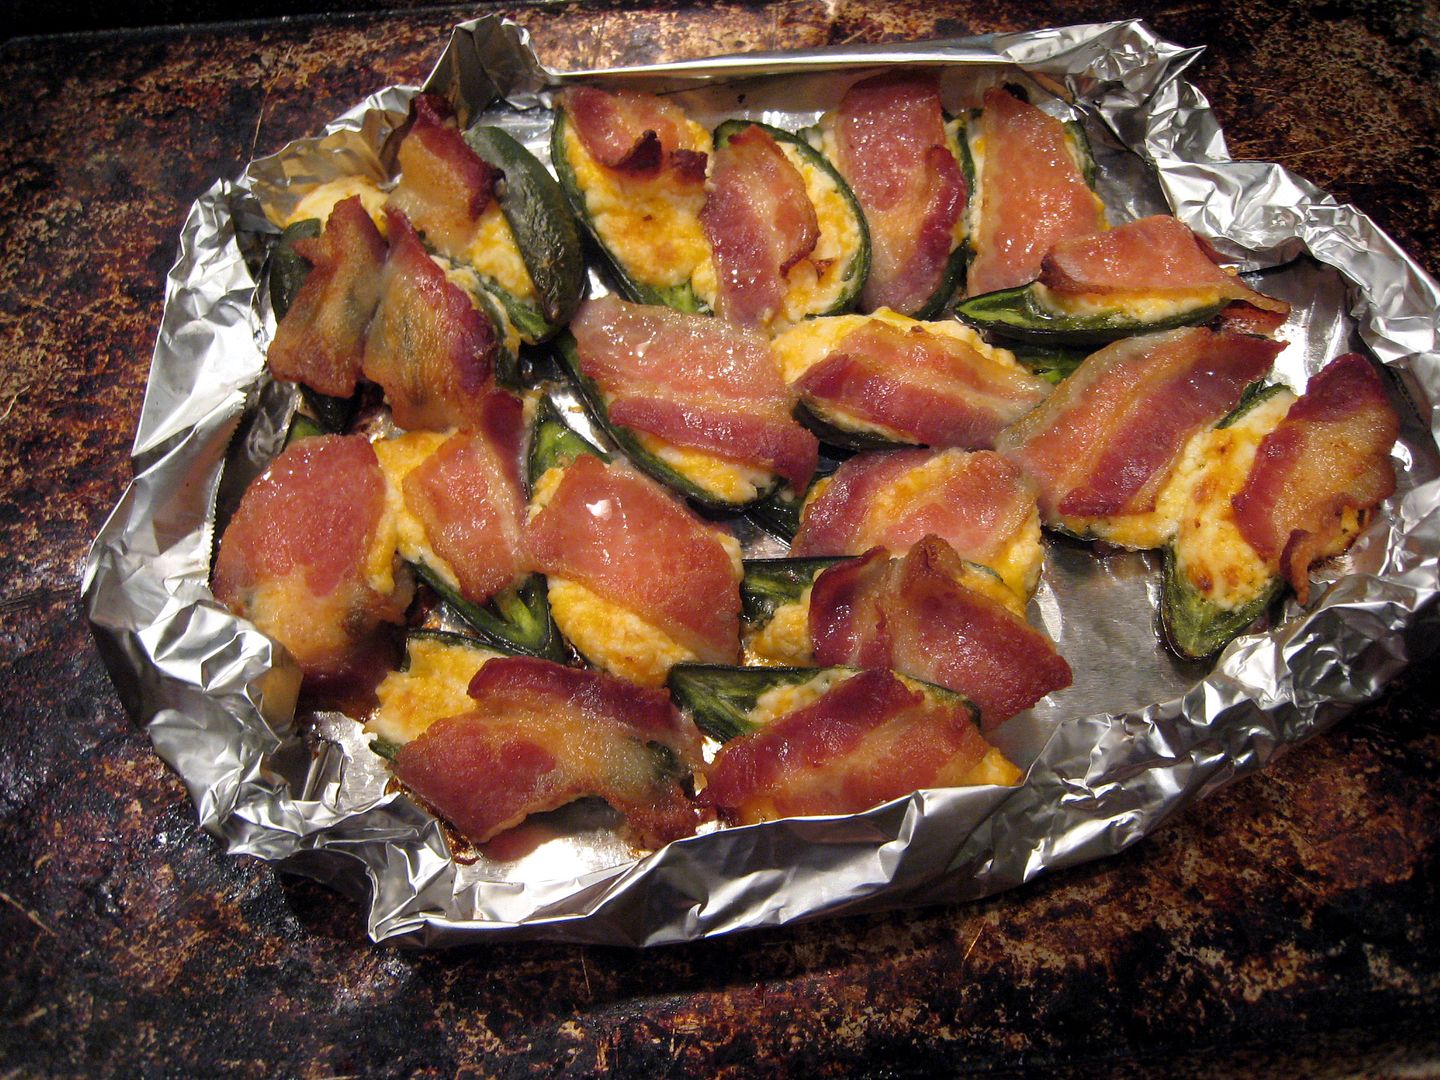
Tonight, as I was stuffing a couple hundred jalapeno halves with cheese, I couldn’t help wondering if this was how Peter Piper felt when he was picking pecks of peppers and negotiating royalties with Mother Goose. This mass of jalapenos, was it even a peck? Just what the hell is a peck anyway?
And Google makes it easy to find the answers to these inane questions. (Mother Goose had no google, obviously, or she wouldn’t have sent those silly pepper peck questions out to the world for debate.)
Yeah, I had a peck, for sure.

About roasting Poblanos…..
Roasting Poblano peppers
The recipes I found for Poblanos all recommended roasting the peppers prior to use in the prescribed dish.
I’ve roasted green bell peppers before and I recall seeing several similar versions of the same process for roasting and subsequently skinning the pepper.
Poblanos had a few variations of similar processes as well, so I figured I’d decide on one, test it and post the results here.
First, what are the common steps in roasting larger peppers?
1- High direct radiant heat from a flame or broiler to blister /blacken the skin
2- Steaming the hot peppers immediately after step 1; the heat retained by the peppers is sufficient if sealed in a small container until cool
3- Removing the skin and seed from the cooled peppers (and then use as recipe directs).
Step 1:
I have used oil on bell peppers as some recipes suggest. I used corn oil even though I like the flavor of olive oil better. Why? Olive oil has a relatively low smoke point in comparison the other “cooking” oils. This not only leaves a better flavor imhp, it keep the kitchen from filling with smoke should you be roasting indoors under the broiler.
I noted that the poblano roasting recipes I found didn’t mention oil; a couple said to rinse the peppers immediately prior and put the on the grill (or under the broiler) while still wet. Given the temperature the peppers would be subjected to during the roasting, it seemed to me that the water would evaporate so quickly that it really wouldn’t make any difference. Regardless, this allows you to skip drying the peppers off beforehand, so I endorse this practice strictly for the convenience.
I’ve roasted 4 different ways so far:
1. Over a gas burner in the kitchen
2. Under the broiler in the kitchen
3. On the gas grill over a flame with the top open
4. On the gas grill over a flame with the top closed
My preferred method is in the reverse order of the list.
Method 1 blisters only a little at a time and doesn’t allow the pepper to retain as much hear for the steaming session. If you are only doing one or two this works well enough; I wouldn’t say the roast flavor is as good/strong as the other methods.
Method 2 is a little better; the oven temperature will be high enough so that the peppers will retain heat and steam well. The downside is that you will put some smoke out into your kitchen, more if you oil the pepper prior. (To blister evenly the hotter the heat source the better btw. )
Method 3 is good; unfortunately I haven’t taken the time to clean the gas ports in the burners of my grill in a couple years so the flames aren’t evenly distributed. This makes a difference since there is a temperature variance across the surface of the grill; with the top up this makes for a lot of pepper rolling and moving around to get them all done at roughly the same rate and to the same degree.
Method 4 is my favorite, especially if I have a large number of peppers on hand to roast. Closing the top gives me the highest temperatures and consequently evens out the heat distribution across the surface of the grill. The peppers are very hot when the come off the grill and the “steaming” session is shorter than any of the methods.
General thoughts on how charred to get the skins:
After trial and error, I believe that a nearly uniformly black or dark brown skin is best. Why?
1- Flavor: if done quickly the “meat” retains a nice aroma that isn’t a “burned” taste as one might expect.
2- Ease of pealing/removing the skin. Anything that isn’t at least brown or blistered is not easily peeled. It’s not a recipe killer to have a few spots with skin left on them; it’s just takes longer to skin.
Step 2: “Self” steaming the hot roasted peppers
One think I learned quickly is that if you completely seal the hot peppers in a ziplock or a bowl with plastic wrap stretched over the top, then leave until cool enough to touch, the peppers will be cooked and completely limp. This may be desirable in some dishes but my personal preference it to leave them with a little more firmness or “body” than this.
My compromise is to put them in a mixing bowl and cover with a cookie sheet. This won’t seal as tightly as the methods described in the previous paragraph and therefore the peppers will cool faster and cook less. If the recipe calls for additional much additional oven time I’ll rinse the peppers off with cool water to stop the cooking after they’ve steamed a few minutes.
Step 3: Removing the skin
If the skins are evenly and sufficiently blistered/ charred, skin is easily removed. However, it seems like it still takes me more time than it should regardless, so plan your prep time appropriately.
I wear latex or nitrile gloves when I remove the skins and seeds. Poblanos aren’t as hot as the jalapenos I also grow and like, but they will still make it uncomfortable if you touch and eye or rub your nose. I don’t ever do it if I wear the gloves; likewise my hands are free of any lingering hot oils afterwards.
Basically I start with a charred section then work down the length of the pepper, rotate and repeat. It really isn’t anything too difficult. I rinse my gloved hands periodically for better “traction” with my finger tips.
To remove the poblano seeds, I insert a knife tip near the stem and open the pepper lengthwise to the bottom tip. There are three sinewy tethers running from the seed cluster to the bottom of the pepper wall; each of these need to be cut before the top of the pepper is removed.
A quick rinse and the peppers are ready to go.
In pictures:
Rinsed poblanos, left damp and ready for the preheated grill:

On the grill (this was an “open grill” effort; note the back of the grate is hotter than the front.

Over the flame:

Rolled over a couple minutes later, note the blisters:

Closer, with a flash:

Moved to the front one by one as they are fairly well blistered:

In a tupperware then covered for the steaming (note, I have decided that just a little more charred is better vs the condition these are in) :


Peeling:

All peeled and ready for de-seeding:

De-seeded, ready for stuffing or? ( The front left was torn up a bot and was pulled aside.) :

Stuffed with a nice rice/vegetable mix (plus cheese), baked for a little while then covered with chopped fresh cilantro. Nom nom nom……

Ridiculous II
The original Ridiculous post exposed the pepper fairy’s generosity to me this season.
The pepper fairy must have been pleased with the post. She (he?) sprinkled more of that magic pepper dust in the garden and produced another load of peppers.

Being a nerd (currently in garden pepper production nerd mode), I had to count them.
16 more poblanos

125 more jalapenos

(I know that someone among my readers someone is more of a nerd than me and will try and verify my count.)
So what in the hell am I going to do with all these jalapenos?