“Winter” grinds on
With Groundhog Day looming, I note that “Winter” has been on the calendar as usual but it has failed to show during most weeks. I’ll note also that this post probably invites the coldest February in history; weather has a way of humbling the cocky….
Anyway, as the days of winter have passed some things have grown and some progress towards spring plantings has been made:
The Raspberry trellis is up, although it may be a season or two before it is needed. Yes, there are raspberry plants in the raised bed currently covered with patches of winter wheat sprouting from the straw mulch:

“Allium lane”, front to back Elephant garlic, spinach, garlic (to be my spring green garlic patch), elephant garlic, leeks:

Shallots getting ready for a spring burst of growth:

All the luffas are dried and ready to be de-seeded, husked and soaked in a bleach solution; buckets of pecans remain to be shelled as well.

The hoophouse has been weeded and replanted with lettuce while kale, cabbage, spinach, spicy greens, chard and some very tired broccoli continue to grow:


The Ajo Rojo garlic in the hoophouse has much more top growth than the bed outside (a single elephant garlic plant is in this bed as well):

The cloudy days have received some assistance bringing up lettuce, kale, cabbage and bok choy seedlings in the “warmth” over two of the water drums The micro-climate over the drums seems to be just right for these hardy seedlings:

Outside the hoophouse the volunteer cilantro has shrugged off the wimpy winter and is thriving:

The old Camellia provides enough blooms to attract a bee or two on warm days (and a camera on this day:)

Bat houses ahead of schedule
Today I stained the inside surfaces a dark grey, almost black, with a water based stain per the instructions.
This is what the inside surfaces all looked like (before I stained them, obviously) with the grooves scored into them.

The almost finished products (caulking and exterior staining remain as well as installing a metal roof).


I’ll connect them back to back and create an additional chamber between them and then start preparing the mounting poles for the whole heavy thing.
Propped back to back, similar to the way they will be mounted (of course they will be trued – they are actually much more squared off than they appear to be in these pics).


After I stain them I have to put some sort of bat or batman stencil on them, otherwise I’m sure the neighbors would be so disappointed. 😉
Bat House Progress
I spent this afternoon soaking in the January sun while cutting up two sheets of plywood and two 1×6 planks.
Result:
All the pieces are in place for the double bat house; I still need to cut some 1 1/2″ access holes in the dividers to allow the bats to move around inside the houses (to find the right temperatures as the days pass). Likewise I must still cut 1/2″ side vents. I have cut grooves horizontally on all inside surfaces for the bats to grip; it was a dusty pain in the rump to get done but it is behind me.
Below, the two houses are roughly stacked together to check fit; the top is to the left and the roof boards aren’t in the picture.

The roof boards will cover the top along with some scavenged rusty galvanized metal roofing; while open you can look into the top of the houses and see the dividers separating the individual chambers:

The division of the interior is more apparent from the bottom; there are 4 chambers in each and when mounted back to back an extra chamber will be created between the two houses. Access holes will be cut to allow the bats to move between the houses. (One will have southern exposure and the other northern exposure; this gives multiple choices for the bats as far as temperature goes inside the houses.

I doubt I’ll get them finished tomorrow- even if I make the final cuts and get them assembled, I’ll still need to apply caulking and stain.
Stay tuned….
No Belfry
I’ve been considering my choices for this year’s overkill garden project (or two) as the days slowly increase in length. Last year it was the well and its 100s of feet of related piping trenches. I’m sure these projects raise a few eyebrows, but unless there is an intervention I will assume I’m safe for another year.
The First project I think I’ll undertake is a bat house. Why? Bats spend all night devouring all sorts of insects that are intent on devouring my garden.
Two summers ago I could see what seemed like hundreds of bats working the area at dusk an dawn due to a colony that had taken up summer roosting in a neighbor’s attic. The guano situation that comes with am attic bat population doesn’t fit well with what most people consider a hygienic home and understandably my neighbor took measures over the winter to seal his attic.
Last summer there was still activity but much less than before; bats were around but not in the insect-population-destroying numbers of the prior year.
My property, even though it is downtown, is in a great location to attract bats to a properly constructed home. Why? Mainly I am surrounded by two rivers coming together and have water within 1/4 mile in 3 directions. I also have nearby a varied terrain with both open and some wooded land.
Bat Conservation International (Batcon.org) is a good place to learn more if you are so inclined.
Back to the overkill thing-
If a small bat house is good, a larger one is better, right?
I’ll be pursuing a larger 2-house version of this one, a 4 chamber nursery house.
(Perhaps one day I will have enough money to be considered “eccentric” instead of my current status as “a little strange”.)
How to enjoy Kale?
This fall I planted some Kale (Winterbor from Johnny’s Select Seeds) after my lovely vegetarian daughter pointed out that Kale resides at the top of almost every “the most nutritious foods” list.
As it grew, I read more about it and tasted a little here and there. It really is quite nutritious; it reliably provided Europe the means to survive winters from the BC knuckle dragging era well into the middle ages.
Before cold weather arrived I was not impressed with its taste, either raw in salads or cooked. I really only nibbled a little out of curiosity as I had read that as with other brassicas, cold weather is the magic ingredient for palatable Kale.
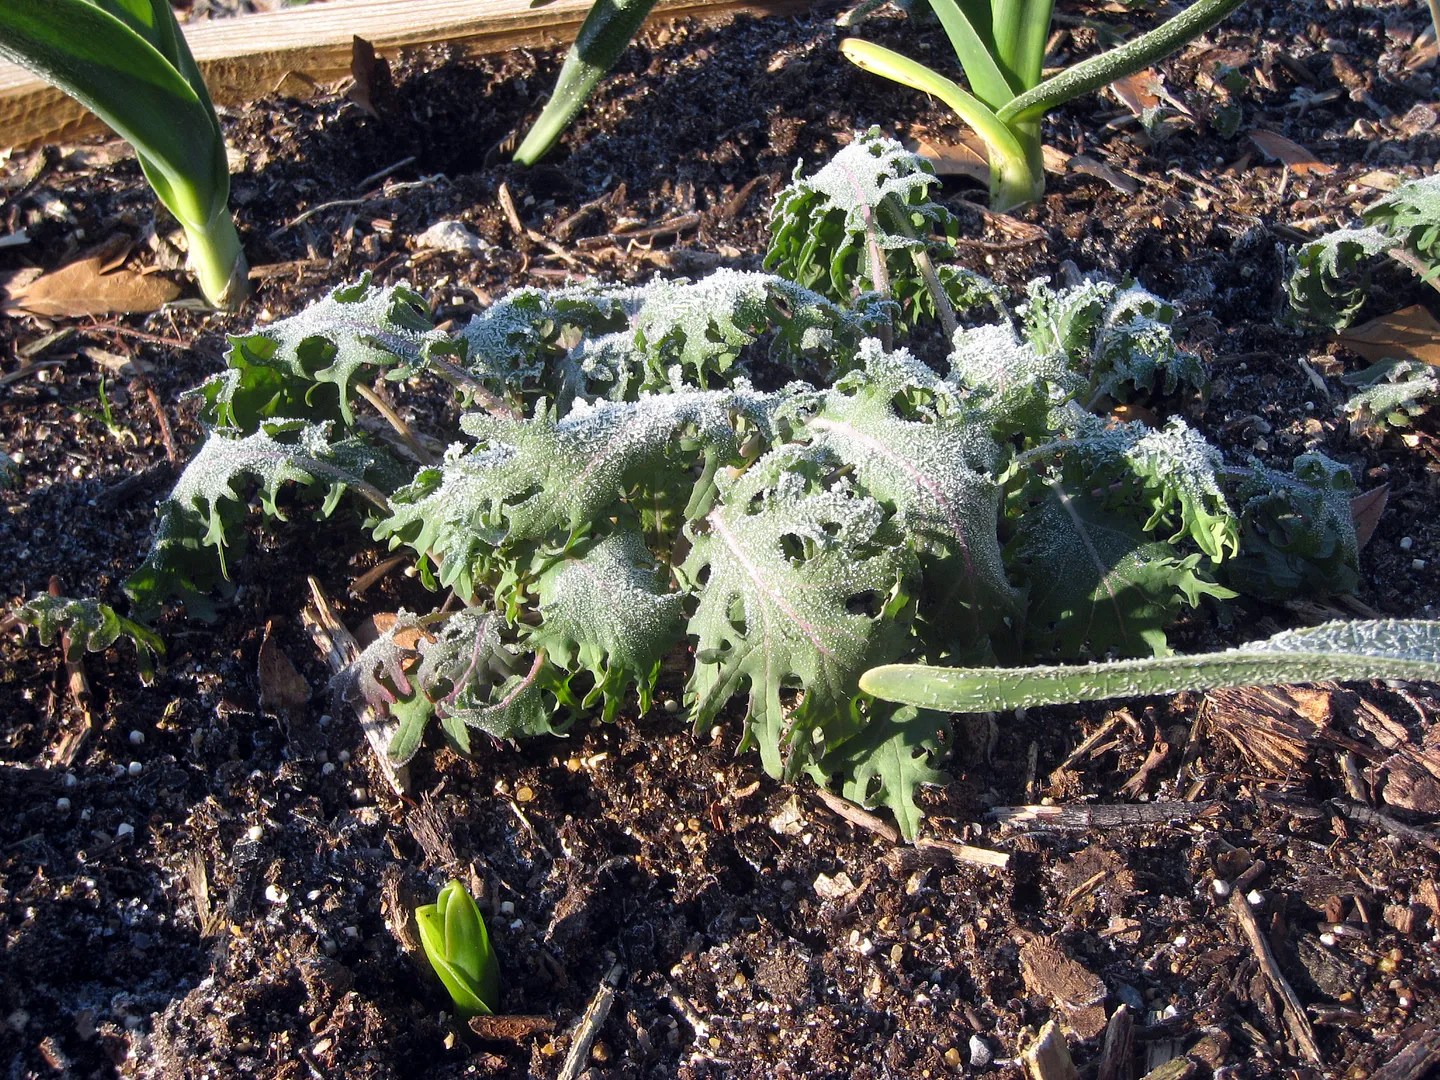
Small Winterbor kale plants doing their thing on a 20 degree morning:

Even smaller Red Russian Kale doing the same (between elephant garlic stalks):
So… I had this stand of Kale in the hoophouse that really needed to be put to use, so after much searching, I decided on this recipe from whole foods (well, sort of): Vegetarian Tuscan Kale and White Bean Soup
“Sort of” means this ingredient list
2 tablespoons extra-virgin olive oil
1 cup diced yellow onion
4 large garlic cloves, roughly chopped
1 (32-ounce) box low-sodium vegetable broth
4 cups packed chopped kale
1 (14.5-ounce) can Italian-style diced tomatoes
1 (14.5-ounce) can no-salt-added cannellini beans, drained and rinsed
1 (14.5-ounce) can sliced carrots, drained, or two large carrots, peeled and sliced
morphed into this ingredients list:
2 tablespoons extra-virgin olive oil
1 cup diced yellowish garden onion with a couple of shallots added
4 large garlic cloves, roughly chopped
30 oz chicken broth (also have used homemade turkey broth/stock)
1 tsp thai pepper oil
1 cube frozen homemade tomato paste
4 cups packed chopped kale
3/4 Cup “sun dried” tomatoes (oven dried Romas) chopped
2 (14.5-ounce) can no-salt-added cannellini beans, drained and rinsed
1 cup frozen baby carrots from the garden, the bigger ones sliced, the little ones whole (oh hell no I didn’t peel them either.)
I added another 10 oz or so water to get a more liquid soup (vs a chunky pile of veggies in a puddle of stock).
Most of what ends up being around 4 compressed cups of kale after the stems are removed:

The “block of stock” (concentrated turkey stock) melting into the mix:

And finally the almost completed soup with SD tomatoes, kale, & carrots:

I forgot to take a picture after I added the beans (cuz it smelled so good I had to eat it promptly.) Once the beans are added and it simmers a few minutes it is ready to go. It doesn’t have to simmer for more than 15 or so minutes before the kale is tender. This is good right off of the stove; it ages well in the refrigerator too.
Is it good?
If the king of weekend lunch convenience (me) takes the trouble to heat it up for lunch two days in a row when there is pizza in the fridge, what do you think?
7 Minute Bok Choy
7 minutes to prepare that is….. it actually takes 6-8 weeks to grow
Bok choy is a no-brainer.
I had never heard of it a few months ago but now it is growing in my garden almost year round. Bok Choy is a brassica (think cabbage, broccoli, kale) and is often referred to as Chinese Cabbage. For the whole story on Chinese cabbage click here for the interesting wikipedia entry.
The cold windy weather that descended upon us this evening motivated me to find a recipe that would be both easy and hot, I decided on this one from “the worlds healthiest foods” website. (Tip: Don’t dismiss all recipes labeled as “healthy”; I have found several that actually taste good in spite of the tag.)
So back to the 7 minute thing….. I went out in the cold wind this evening and returned with a nice medium sized bok choy specimen:

I used the recipe linked above as a template but modified it. No ginger…. 1/2 tablespoon of Asian oyster sauce in the chicken bullion water (who has 3 tablespoons of stock ready anyway?)… Lime juice, not lemon juice, because that’s what I had… Kroger generic soy sauce vs the fancy tamari stuff it called for…. 2 small cloves of fresh garlic vs 1 clove….no sesame seeds and definitely no tofu. Basically I just went with what I had on hand.
Was it good? Yes, much better than I anticipated. Mrs cohutt gave it raves and I will definitely prepare this again. This made two nice side dish portioned servings.
4 minutes as the recipe claims? More like 7, I had to count the 3 it took to wash and chop the choy. 😉
January garden treats
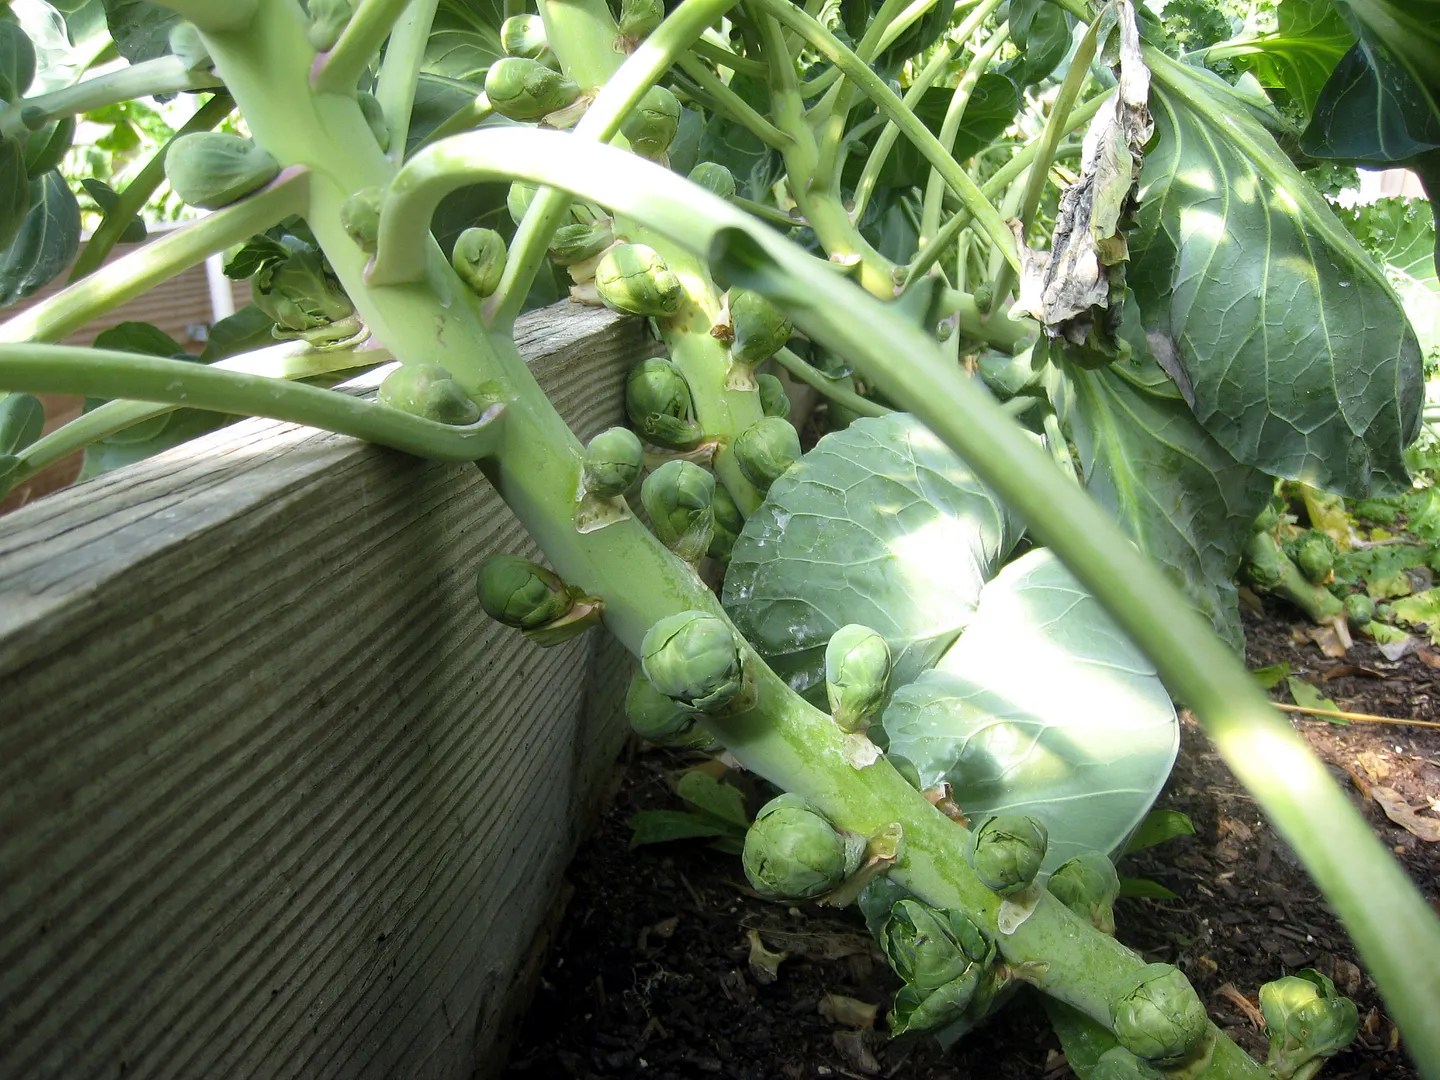
The Brussel sprouts are doing much better this year vs last. I will attribute this to 4 factors changes vs last years attempt:
1. Hoophouse warmth- soil air etc are all warmer due to the hoophouse covering (not to mention the relatively mild winter so far vs this time last year when we were under 5 inches of snow…..)
2. More compost / nutrients in the soil this year
3. More consistent moisture level in the soil (thank you hoophouse)
4. I remembered to clip the leaves up the stalks when the sprout buds were forming.
We are in a heat wave right now, so instead of using tonight’s cabbage head for soup, I’ll make a nice batch of fresh cole slaw. (Actually not a heat wave, just unusually mild temperatures for early January. Currently, at 6:00 PM, it is 64 degrees and the highs are expected to be over 60 for the next two days as well….)
I had a couple of small radicchio heads still hanging in there too, so I’ll add a little of it as well. Maybe a minced shallot too..

That’s all for today. I know it isn’t much but heck it is January…
(The sprouts are for mrs cohutt to snack on while I type this quick post and then make my slaw….)
Meanwhile, back in the polytunnel…….
The weather was so nice today I that took a few minutes at lunch to absorb some sunshine out back.
(The previously frozen plants are pretty much fully recovered now.)
I was surprised how much the brussel sprouts had filled out in the last couple of weeks. Last year I never cut the lower leaves off and the sprouts were tiny (somehow I missed that recommendation).
Also, these have enjoyed the warmer, moist air and soil under the poly cover.
One plant had been strangled by the sugar snap peas that I removed a few days ago (bad layout idea) and is significantly smaller that the others. I’ll give it a chance now that it has some room.
Regardless, here are the two mediocre pictures that resulted:

Life after tomatoes follow up 1
Today it was sunny and in the upper 40s / lower 50s again; 30 hours after the frozen shots in the previous post, things are mostly recovering
The arugula ice sculpture has thawed and it appears to have come out ok, with the exception of the buds that were beginning to form. It has a ways to go but I expect the milder wet weather coming in tomorrow will be therapeutic.

The greens are mostly on their way back to normal other than some of the larger floppier mustard greens. These sometimes looked like this before the freeze so I’m not sure they are actually done in. (If you look carefully you can spot the thornless blackberry canes that will ultimately own this bed)

Kale- no problem (The arugula is still suffering a little though…)

Spinach seems to be doing fine other than needing some weed relief
(same bed as yesterday just taken from the other side oops)


