In the beginning II
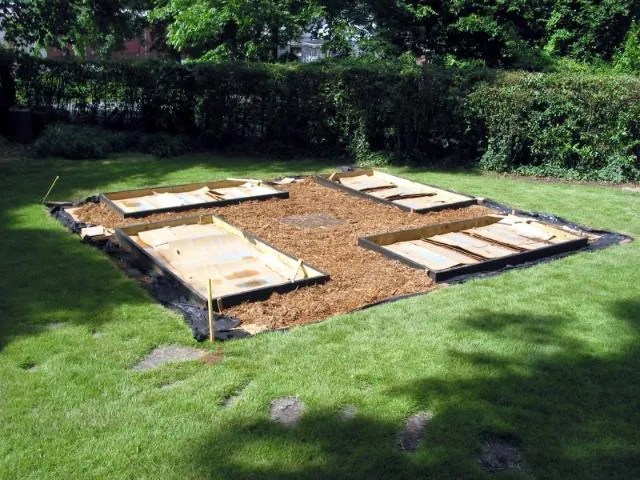
I added the middle bed and ended up with four 32 sq ft (4’x8′ ) beds and one 16 sq ft (4’x4′) bed, then it was time to fill them.
Mixing using a large tarp is the best way to get it done; trying to turn and rake and mix it by hand is a losing proposition. Either way, it is a dirty job, as the self portrait of my feet on mixing day proves:

If you buy compost by the bag through the big box garden retailers you will spend real $ filling the beds; fortunately I had been preparing a large amount of compost in anticipation of the garden. Below is a shot of some of the composting bins brewing several years of fall leaves mixed with a truckload of dairy manure

With the beds filled and the grids marked with string, the garden was ready for planting by mid June.

In the beginning
Square Foot Gardening?
Before I started this backyard boondoggle, I came across “Square Foot Gardening”, a method pioneered and promoted by Mel Bartholomew. Mel believes that traditional row gardening is inefficient and labor intensive and that most gardeners can enjoy higher yields with less frustration using the SFG method.
The basics:
- Use a “perfect” soil free growing mix (“Mel’s mix” is 1/3 each peat moss, compost & vermiculite)
- Put the mix in raised beds so that it is never compacted and doesn’t need tilling
- Plant intensively (tight spacing) in individual square foot spaces lined off in a grid
- Inter-plant for reduction of disease and pest issues
Hop around his website some and buy his latest book if you are interested in more information. http://www.squarefootgardening.com/
A year ago I decided to take the plunge and I used Mel’s blueprint for 5 beds inside of a 20×20 spouse-approved space in the backyard. I rented a sod cutter for an hour (followed by lifting and moving sod for about 5 hours) and the adventure began in earnest. I was getting a late start and knew it, but I have learned over time there is “no time like now” to begin.
I had collected a substantial amount of cardboard and used a couple layers of it as the initial light / growth barrier to keep the turf grass (and weeds). Why not weed block fabric? A) It costs $ and B) It doesn’t work. C) Cardboard becomes part of the soil when its job is done.
I didn’t 100% buy into this at the beginning and tried to use it around the edges as can be observed below. Trust me, cardboard or several layers of newspaper is the way to go.
A thick layer of shredded cypress mulch in the filler space and I was on my way, ready for mixing the “soil” and filling the beds:
A year later I see this picture and realize just how little sunlight I had to work with; the sides of the beds and larger square are oriented N/S E/W and conveniently shoehorned into the June midday sun. I didn’t stop to think that the summer solstice is a June event and that this sun foot print (sun-print?) would be as good as it would be all year.
Mutant squash?
Yellow crookneck squash.
Conjoined male blossoms


…

.
Inside Red “Dragon” Carrots
I have been asked if the Dragon carrot I referred to in Seed Saving Shame II
was red all the way through.
The answer is :
“NO”

Oh hell he’s posting about gourds again
This evening I took a closer look to see if any female flowers had appeared on the gourd vines and found a few, although it’s too early for me to tell if I’ve gotten lucky with some early pollination.
Odd things these little gourd embryos- all are a different shape.


If it is hot (it was) and the early evening sun comes back out (it did), would anyone think it odd that a 50 year old man duck-waddled for a little shade under a canopy of large leaves running up a makeshift trellis?

Tip: Don’t go where people normally don’t go and bugs normally do go… you will notice bugs you never knew existed.
Is there an entomologist in the house? What are these odd little things? Do they eat my plants or eat bugs that eat my plants?

Done.
😉
Big Garlic Plans for 2011
Warning: This post contains no pictures and minimal nonsense; if pictures and nonsense are what you came here for, please tune in to the next post for mostly unnecessary birdhouse gourd obsessing.
After my almost accidental garlic “crop” I have decided to put a little thought into next season.
Hardneck isn’t supposed to do well here due to the typically mild southern winters. I may have gotten lucky this year due to this past winter being somewhat colder than “usual”; the garlic is tasty but smallish and ideally the cold enhances the flavor or intensity.
While stumbling around the web recently in my quest for the holy grail of garlic, I discovered “Creole” a hardneck variety that supposedly thrives in hot climates (including Arizona and Texas). This somewhat scarce variety seems to be on the rise; its lineage I believe comes from French cloves grown in Spain over the past few hundred years and the result is warm climate suited hardneck with a rich flavor.
I plan on ordering some of the creole hardneck and a little each of a silver skin and artichoke softneck variety and then in the future start saving the best for the next fall planting. If I stick with it, I ought to have some good stock to work with in a few seasons.
So where to order?
First, I’ll order some from Ronningers Potato Farm LLC. Why? Their little low tech catalog has the best “how to” and cultivation explanation I’ve seen for everything they sell including spuds & garlic. I have felt a little guilty for referring over and over to their catalog’s help pages for my Seed Savers Exchange potatoes. (In my defense the catalog didn’t arrive until well I had already ordered from SSE for fear of the varieties I wanted being sold out.) Also, I emailed them this week about garlic and got a great reply:
_____________________________________________
Mr cohutt,
The web-site is not currently set up to take fall garlic orders. We are in a transition stage right now combining two web-sites and once that gets finished we will make the garlic available on-line. You are welcome to call, put a mail order in or fax your order in if you want. I can also take your order for garlic via e-mail and contact you for your payment. We will be happy to help you any way that we can!
They started harvesting the garlic yesterday!! Looks like a great crop so far.
Michelle
Ronniger Potato Farm LLC
877-204-8704
________________________________________
Additionally, I think I’ll try the creole hardneck from Gourmet Garlic Gardens of Bangs, TX because
1. They have creole available and it grows well in their climate
2. Bangs, Texas looks as hot as it is here
3. I liked their “year in the life” page; garlic farming looks pretty cool. 😉
Seed Saving Shame II
The few carrots that germinated this spring have been putting some significant tops up. I had planted St Valery and Dragon both last summer and again this spring. Germination was decent last August and the carrots were a sweet treat for most of the winter. When I seeded again this April I got spotty germination (perhaps I should actually read up on the proper planting times for North Georgia eh?).
I was impressed with the superior growth of the few growing tops this spring vs last fall although the first carrots pulled were long and skinny. (Edible, but not of braggadocios picture posting quality.)
I just figured something out though……
At least one, and actually probably most, of the robust topped carrots were not spring germinated seeds.
How so, you ask?
Carrots are biennial, in that the flowering and seed cycle takes part of two seasons to complete. In other words, seeds planted this spring might generate some tasty carrots but if left to grow the tops would not flower this year. The carrot has to remain in the cool ground over the winter in order to turn on the flowering switch.
Where is the shame in this?
Um, well, uh, I guess I missed some carrots last winter when I finished the harvest. I now have a 2 ft+ carrot top well on its way to producing a nice flower.

So once again my negligence has helped me unwittingly set myself up for a possible bounty of free seeds. I prove once again that slack gardeners are in fact rewarded on occasion.
In celebratory anticipation I dug two of edible carrots available this June. Yum.


Roma luv
I’m sorry, but while I was inspecting one of the Henderson bush lima plantings I couldn’t help noticing the wall o’Romas in the next bed. 😉
(I love June- It is the best month of the summer season- garden optimism still abounds, the “work” is still very much “play” and the bugs/ dog day weather haven’t set in to take their toll yet.)

(These are 3 of 15 Roma VF bushes in concrete re-mesh wire cages)
What Lies Below or Bullet Garlic II
Garlic is supposed to be harvested when some of the leaves have browned; some suggest precise percentages of browned vs green leaves but the opinions vary. From what I have read, one leading indicator is when the softneck varieties flop over as the bulbs mature below. To the contrary the hardnecks don’t flop due to the scape or flower stem providing core support, hence the “hardneck” description
I read in several places that the hardneck scapes should be removed when they appear; the idea is that more energy the leaves pull in from the sun can go towards bulb development. I did as advised and removed them then tossed them out shortly after showing them to my lovely spouse. Well A day or so later it seemed everywhere I visited on the internet there were references to the what a delicacy the cut scapes are, how they should be savored for their unique garlic taste and how basically only fools throw them out. Oops.
A couple weeks ago, mine had started to brown and had definitely gone floppy on me, the softneck much more so than the hardneck.

I pulled one of each and hung them out to dry then took the opportunity to show them off to my modestly curious family. These were not huge, but certainly not a disappointment by any stretch.

The hardneck is the more round bulb on the left, the softneck is the one that looks like it should be hanging below a bull at the county fair.
Sidebar: We decided we had to eat some of it right away and ended up roasting it with a little olive oil drizzled on it. Delicious.
I’ve been getting more impatient lately anxious to get some harvesting going as the lettuce is petering out and the increasing ground cherries aren’t tiding me over to the peak summer season very well. So I grabbed my Ho Mi and used it to get under the bulbs and get them started lifting- the little roots really cling to the ground and I didn’t want to damage the necks by pulling too hard. As you can see the leaves were browning a bit and I had to hold up the plants to take the picture.

A Coca Cola liter case crate served as a basket and a few minutes after this picture I had around 3 dozen garlic plants pulled and ready to hand up to dry.

Garlic is supposed to be allowed to dry a bit (I have read anywhere from a single week to six) preferably in a place out of the sun where the air circulates well. The coke crate with a little wire added made for a decent drying set up and i hung it up in the porch of “Lizzie’s House”, the old servants quarters that watches over my back yard. (At first I pictured myself going to the trouble of tying the plants together and hanging them in clumps over a taut wire but lunch was looming and well… I’m no Martha Stewart so I don’t have to do it that way now do I…)
Anyway, here they hang:

Next: Garlic thoughts for next season
