Midsummer Photomapping Part #2
Installment #2 in the photo-mapping project covers the middle section of the back, basically the area in between the two red lines in the “sky” shot below.
This was where the garden project started; the beds labeled as “6” officially replaced lawn in June of 2009 and things only accelerated after that.

#1 is a recently constructed mini-bed to “contain” peppermint that was an impulse purchase. Behind it you can see #2, the raspberry brambles cascading over a trellis. As an afterthought, I put an odd-shaped bed in the mulched area to the left; this would be #3 and it contains an artichoke plant and a 2 year old chard (“Fordhook giant”) root that just keeps on growing. I moved it there from a back bed “temporarily” and there it has stayed all summer.

Looking back towards the raspberry trellis:

and

I moved this 3 year old rosemary bush (also visible above) from the nearby beds to a spot where I could unbind it and let it spread to its natural shape. It has a way to go yet but is looking much better now.

The nearby artichoke plant (with old chard in the background):

Down the fence a bit, the area marked #4 is a tangle of odd transplants like oxbow daisies and sage planted around the two Carolina Jasmine vines slowly gaining a toehold on the fence via the iron gates secured to the front. (The black/gray panel between the gates is a framed shade cloth panel that migrates around the garden as needed. )

The next 3 pictures are from panning the camera to the left over the whole middle area:


And from a different angle, a shot across the yard at Lizzies’s house (#5). Confederate Jasmine is slowly climbing the two corner posts and several small Japanese rooftop Iris are planted at the left corner.

Panning right across #6, you can see that there is a middle bed, a strawberry pyramid. The bottle rack is something i made on a whim when I was in possession of a borrowed welder/ the bottles were all found buried on the property, mainly in the ground under the privet hedge I pulled in the winter of 2009-2010.

Looking over the same ground (#6) towards the patio you can see that I like Thai basil and am remiss in removing volunteers so that they eventually take over a large part of some beds. The blooms are a great attractor of pollinators; they have been covered with honeybees lately, presumably from the same hives that found the pond last month during the dry spell. The black frame was made to hold two shade cloth panels if needed; I shaded the last of the spring lettuce to try to slow the inevitable bolting. There it stays until it is needed elsewhere. Kale is behind it, suffering through heat and harlequin bugs until cold weather arrives.

Area #7, the blueberry beds (I may move one to get better alignment for the bird netting frame next year.

Another confederate jasmine and rosemary bush are at the corner of the shed behind the blueberries.

And finally, #8 in the map- the curved bed in front of the shed and 3 small afterthought beds that have stayed in place since 2010. The tower is made of a couple of bamboo tripods secured to the ground with re-bar (the beans are “Christmas” limas and no, I don’t know how i will pick the beads in the top half yet.)

Some snap beans are planted in the far end of the curved bed and in between rutabagas are coming up. I made a rough border of logs around the stump behind them and back filled with soil mix; two types of Iris were planted at the first of June and are doing very well, probably due to the good drainage of the leaky bed.

That’s about it for the middle section; I’ll get off my rump and think of something to work into the plan this fall even if only cover crops.
Midsummer photomapping Part #1
Last week I snapped a disk full of garden perspective photos last so that I would have something to reference next spring when I’m planning out the summer garden. I also wanted something to reference while on vacation as I consider what changes can be made during the off season that improve the overall look of things. Most of my major “infrastructure” projects are done (it has been a long 3 years) and I might have the time and energy this winter to rearrange a bit, add and remove a few things and generally speaking tie off a few “aesthetically important” loose ends.
If you haven’t broken the code by now, “aesthetically important” can be translated as getting rid of the last eyesore areas that crawl on Mrs cohutt’s nerves and adding substantially more color, ie flowers and pretty things I can’t eat.
In this series I figure I’ll just take an area at a time and lay it out for all to see and include thoughts and rationale for why things are the way they are.
The first stop is the patio area immediately below the sun room window; it also happens to be the most recent area that has received a make over. In this case the makeover started with moving the common boxwoods from the patio border (I relocated some and donated a few to a friend and coworker who moved into the neighborhood)..
The patio furniture has a fresh coat of paint now and moving the boxwoods allowed for a border bed to be installed on the front and left side

The fence side has a mixed bed of perennials and self reseeding annuals that have taken hold (I forget the names and aren’t where I can look them up).
A late seed planting of two types of hostas is under the plastic fencing (which keeps cats and squirrels at bay until the plants have half a chance).

The corner has an offspring of a large sage plant in another area of the yard; I decided to see how well Sage does in partial (mostly) shade. I’ve also tried to control the weed growth in the shaded area beside the patio over to Lizzie’s house with mulch (for now).

The addition of a dripline into the inhospitably hot and dry section between the patio and the foundation has made all the difference in the world. The formerly barren and “brick-locked” bed is now a thriving patch of mint (from a couple of plants donated by a friend a whole back) with a rosemary cutting establishing itself on the end.

I somehow decided that a good spot for two old pots id in front of the wild perennial bed; one has thyme and a purple basil of some sort and the other has several elephant garlic corms I had given up for dead until two sprouted months later.

I had no idea what I wanted to place in the “new” borders freed up by the boxwood moves; in a pinch I decided to transplant some basil seedlings and then added some rainbow and ruby chard. I hadn’t paid enough attention to how much sun each part of the border actually gets and decided temporary plantings would be best. The chard may get eaten this fall but originally it was planted as a filler because I just like the way it looks.

The hostas I referenced earlier will likely spend a little time where I seeded them but will ultimately be thinned via transplanting to fill in other shady areas nearby.
There is a lot that can be done with this area that might look good; I just need some ideas and perhaps will even loosen up and follow some advice from people who actually know what they are doing.
Garden Break
I’m enjoying some “down” time this week and have granted harvest rights to friends and family in return for checking in on the fat kitteh who remained behind.
Will my garden look like it has been ravaged by locusts when I return? 😉
The Nikon came with me and I’ve spent time trying to to become minimally proficient in some of its capabilities beyond basic garden photos.
A gigabyte of trial shots later and I have a few that were interesting enough to post; the lightning pictures turned out “OK” but slightly out of focus as my guesstimation of the manual focus setting was a near miss. (Note to self: check the focus on a distant light before setting the camera on a tripod pointed out towards the darkness of the Atlantic in a thunderstorm. )
Storm:


Sunset


Backyard Rice Optimism
The grain is really visible now on the rice (I suppose that I’ll need to consider how and when I am going to harvest it now.)
From the end of the “paddy”, you can really see how the plants have developed. Each seed created a mall single stalk when sprouted; once rooted the plants put up several additional stalks. With each plant now comprised of at least 8 or 10 stalks it would appear that I planted multiple seeds in each spot and never bothered to thin them.

And from the back side the stalks remain surprisingly upright and don’t lean much to the “openness” around the edges as one might expect:

A closer look shows that each of the stalks will have a single cluster of seeds (“the panicle”) with no branching at all up the stalk.


How will I know when the rice is ready to harvest?
I’ve found several resources on the web, the most comprehensive being the Cereal Knowledgebank co-sponsored by the International Rice Research Institute (IRRI). The main rice page is here.
Fortunately this resource covers methods of harvest and processing ranging from using state of the art industrialized equipment all the way down to the barest of manual labor. Several of the photographs include participants who most definitely qualify as this “barest of manual labor” in that they aren’t in closed toe shoes or are barefoot. While my processing techniques will fall into this “BML” category, for the record I do intend on wearing my boots.
OK, so when to harvest? According to this great IRRI reference page, when “80—85% of the grains are straw (i.e., yellow-colored)” or “for dry season harvesting, an optimum time is 28 to 35
days after heading”.
There are other guidelines for harvest timing listed that are beyond the guessability quotient of this backyard rice farmer so I’ll just wing it based on these two.
And it will be posted here, successful or not. 😉
The Whole Thing
From a ladder against the back of the house, a shot from above.
(Keep clicking to get a larger picture and to zoom.)

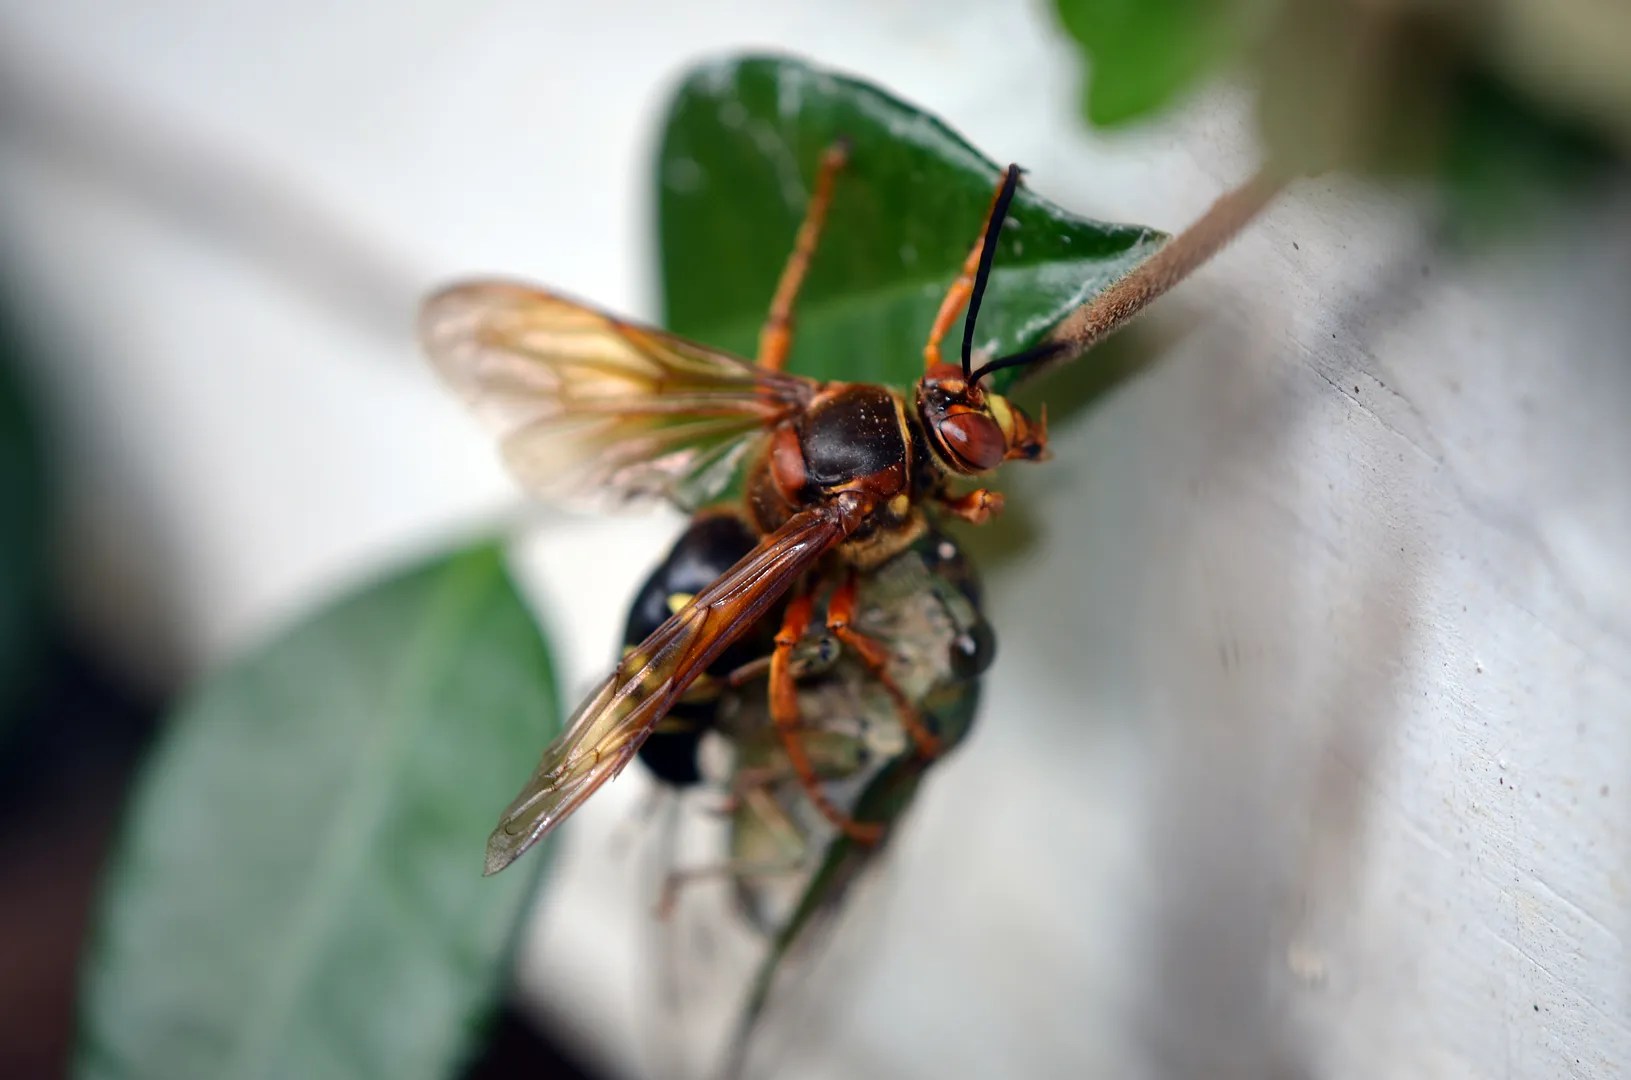
The Cicada Killer Work Ethic
Ok, so you might recall that two days ago I posted a picture of a cicada with the promise of a future post giving the story behind it.
In hindsight there isn’t much of a story, but here it is regardless:
As their name implies, Cicada Killers have one source of livelihood and sustenance, the homely Cicada. As the cicadas emerge each season, so do the Cicada Killers. Once their burrows are started and they have gone through their mating rituals, the large female “CKs” spend the balance of their relatively short existence hunting and retrieving Cicadas. The wasp’s sting isn’t a strong one; it is just sufficient to paralyze (but not finish off) a Cicada. Once incapacitated, the Cicadas are hauled back to the burrow and sealed in a chamber with a single egg. You can guess the rest (think “Invasion of the Body snatchers” or “Alien”); of course the egg hatches and by June of the next year a new wasp emerges.
However, the relative size of predator vs prey sometimes creates a logistical issue for the wasps. Even through these are among the largest wasps in North America, they can still be significantly undersized compared to the average cicada and tend to lose altitude quickly when burdened with their oversized payloads. They fly like an overloaded aircraft that has lost all but one weak engine; occasionally I catch one in its lumbering approach flight, wobbling inbound with trajectory that should have an accompanying and panicked “Mayday! Mayday! We are going down!” radio call with it.
If the return flight falls short, the CK isn’t done; she definitely doesn’t give up. However, over most terrain, they can’t efficiently drag their prey (more of a “buzz wings and barely ski on the ground” with the Cicada); they must find something to climb and from this higher point their homeward bound flight is re-launched.
Late Saturday, I caught a crash landing out of the corner of my eye and found a large female Cicada Killer lugging the even larger Cicada featured in the previous post. I watched as she first climbed a large flower pot, which enabled her to fly a good 12 or so feet laterally to the base of Lizzie’s porch:

I continued to track her and photographed as she made it up to the surface of the porch and launched again to the next highest point.
Up the brick footing:

Roadblock:

Time out to wipe her brow and antennae with her free front leg:

Plan B, the detour begins:


Time out for more grooming:

<br
Back to Business:


After a herculean effort which included both wing and leg power, she finally reaches the porch surface:

No time for rest; she immediately moves to her right and continues up the drying shallots:


Note that in this last picture that her wings are beginning to buzz and that she has turned to look my way. Always looking for the next productive step to gain the most altitude possible, she has noticed a considerably taller object within a short hop and in the next instant was on the photographer’s hip.
I am aware that Cicada killers do not sting humans and have even played games with them before and gotten them to land on me (what a bored old garden nerd eh?). I tried to avoid hyperventilating as she started up my side and attempted to execute a hurried series of photos to prove my stoic dedication to documenting nature’s cycle. However, these pictures turned out similar to what one might expect from a photographer shooting his own mauling by a grizzly; they were a series of indistinguishable blur.
In the 10 or 12 seconds it took for her to climb from my hip pocket about halfway up to my collar it dawned on me that she wouldn’t stop until she reached the highest point on my head, which at best meant the traverse of the back or side of my neck, or at worst my face.
Yes, I lost my nerve. One huge flinch and she temporarily dropped the Cicada then buzzed me angrily as I took its picture. The cicada remained frozen in the same pose throughout:

I moved on and remarkably she resumed her journey by launching from the step to the boxwood nearby. I let her finish on her own, I had helped enough. 😉
Cicada
Hard to believe this little bugger is what drowns out everything else on summer nights.
There is a story attached to this one (to be posted soon).
Click for a larger view:

Cicada
Freak Show Tomato
This one looked like it was bound in baling wire when it was half grown.
Never seen one quite like it before.
We have had no radiation leaks behind the fence, or so I thought.
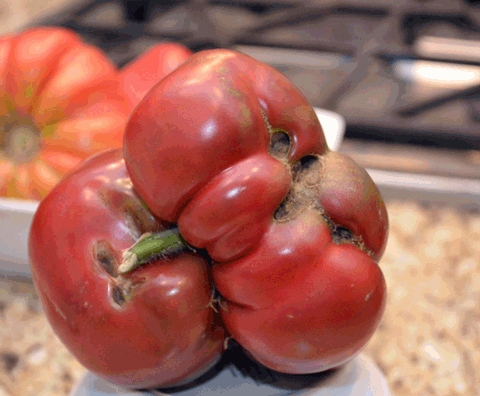
Note: It was difficult to get it to sit still for the pictures. Should I be concerned?
A little bit of little hail still leaves a mark
A brief hailstorm hit us during a recent (welcome) deluge.
It wasn’t particularly long, was only “average” intensity and the size of the stones appeared to be the size of mothballs at the most…..
I didn’t think about it again until I noticed all the broad horizontal leafed plants in the garden like squash, sweet potatoes and chard now share a common trait.
They all look like they were shot with buckshot:

A few of the chard stems were broken but otherwise the plants don’t seem to be suffering from it.
In hindsight I don’t know why this would have surprised me, but it did.
If we were to have another storm like the one a few years back (the one that caused about half of the asphalt shingle roofs in the county to be replaced) I doubt anything in the garden would be left standing.
