King Cole
The cole crops are in the garden.
This year’s selection includes broccoli, cauliflower, brussel sprouts (because I love my wife), a couple of cabbage varieties, some chard and even some turnip greens. (All are of the mustard family and are descendants of wild cabbage originating in the Mediterranean area. The Texas Aggies say so- check the link above.)
Now that you are as amazed as I was with this incredibly interesting information I’ve used as an excuse to post some pictures, here are those pictures:
I mixed all of them into 3 beds and parts of a couple others. Which is which will become apparent as the plants continue to develop; I neglected to document what I put where…..

(The low green plants in the middle of this bed are New Zealand Spinach, not a cole crop if you were wondering… not a true spinach either… but you weren’t wondering. Or were you?)

Speaking of spinach, the few seeds that germinated a month ago when it briefly cooled off are doing well as young plants. The rest are still sitting in the ground refusing to emerge.

And finally, and unrelated picture that I just wanted to post because it looked nice and was 100% from the ground behind cohutt’s fence. 😉 I almost missed it, there was an extremely brief window of opportunity. 🙂 🙂

>> King of the Garden Lima, Christmas Lima (the purple ones) , Brandywine tomato, German butterball, french fingerling and purple viking potatoes all with a little window parsley added
Allium for fun and profit
Actually Allium for fun only, but that doesn’t make a catchy title.
As the link above describes, the Allium genus includes garlic, onions, leeks, shallots and a few other underground edibles.
One of my many garden revelations is season involved growing garlic.
3 things registered with me after harvesting the garlic:
1. As an old timer told me when he saw it in my garden: “Even an idiot can grow good garlic, he’d have to work really hard to screw it up”. (He may have been directing this at me but I don’t think so. ;))
2. Garlic is self-perpetuating, meaning you only need to get some planting stock once; you save a few of the biggest heads to plant for the next season and eat the rest.
3. It does a lot of its growing in the dead of winter and early spring when everything else in the garden is dead and gone. Granted it is underground and I can’t actually see it grow over the winter, but I know it does.
None of this is a secret, any garden book will tell you the same thing. But like so many other things, I had to see it for myself to have it register.
So-
Peaceful Valley Farm and Garden (http://www.groworganic.com/default.html) had basic garlic for cheap as well as shallots, so they got an order from me earlier this month.
The order came in yesterday and the aroma of the box filled my office all day long. I ordered a basic silverskin softneck to jump start my garlic stock- it was less than $5.00/lb vs at least twice that through most suppliers.
Additionally, French red Shallots were under $5.00; these were harder to find and much more expensive elsewhere if they could be found. I liked the idea of shallots for the same reason the garlic registered with me; unlike traditional onion sets, a shallot in the ground in the fall yields several the next summer. Another plus was the mild flavor and decent storage life.
Finally I decided to try some Elephant Garlic – an oddity that isn’t really a garlic but a member of the leek branch of allium. Wow. Big. Wow.
Left to right: a traditional bulb of silverskin seed garlic, a clove of elephant garlic and a shallot.


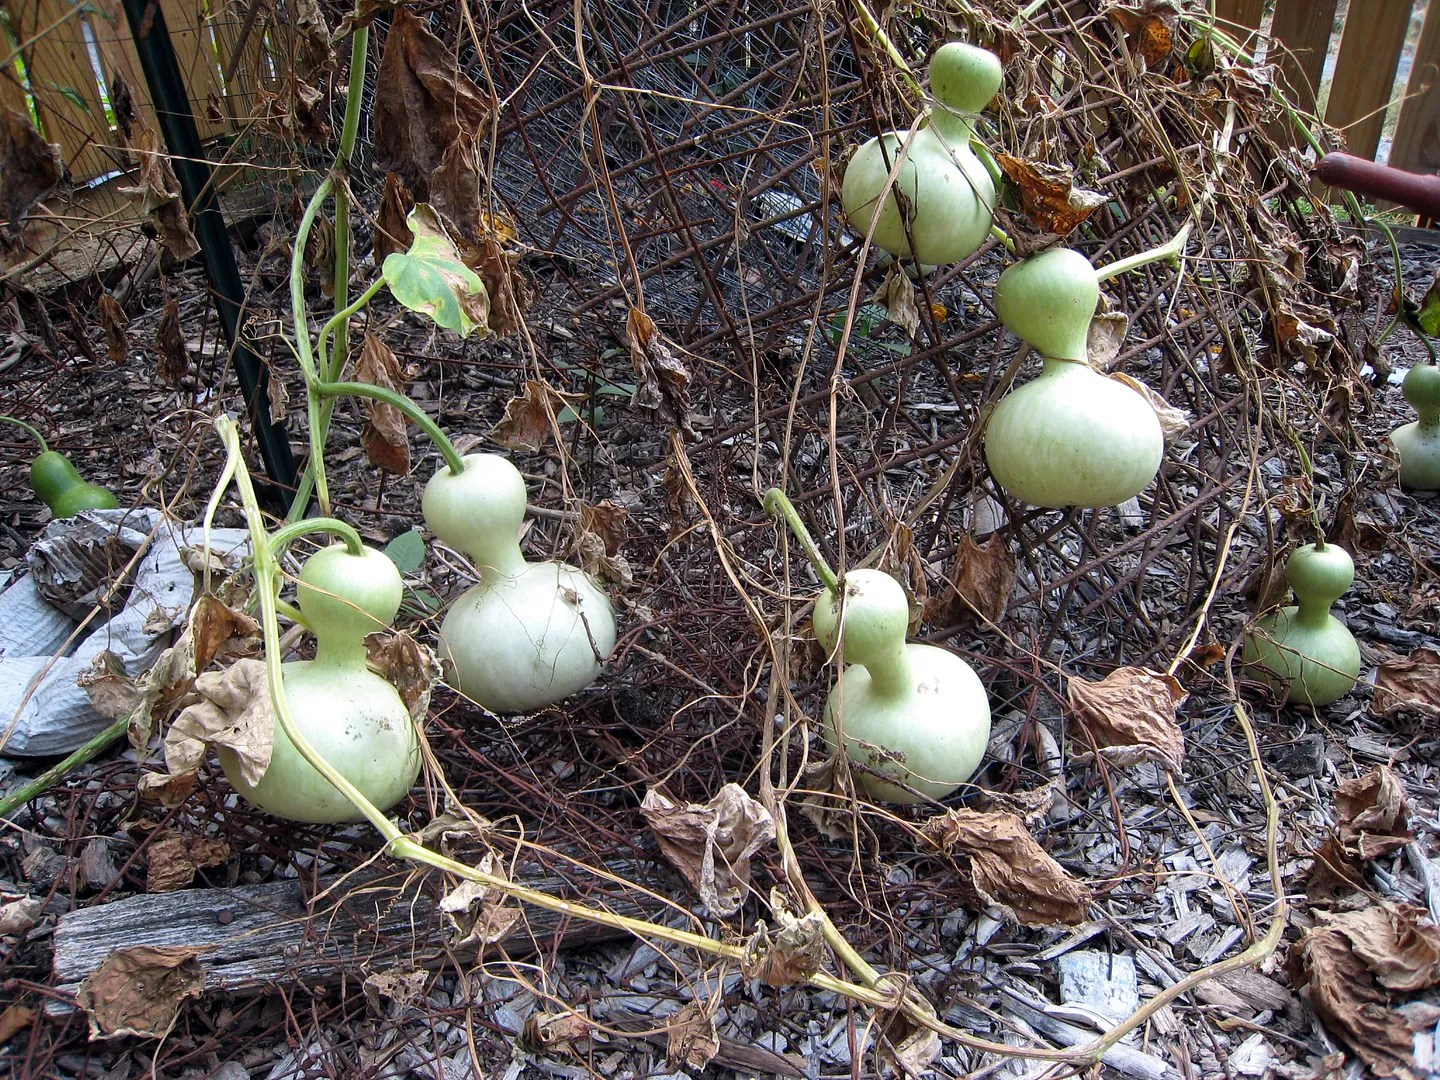
Gourd Army
OK, so I got moderately distracted this past weekend and cut gourds off the withered vines and set them on Lizzie’s porch (for a few months of drying and curing).
I’ve read that the gourds can be harvested when the “stems” turned brown and withered; they also can be left out until frost and harvested after the vines are completely dead. I chose to go ahead and harvest them. Actually, I just cut a couple and the next thing I knew the wheelbarrow was full x 2.
Mrs C mocked me appropriately for carefully setting up my little gourd army so that all were sheltered and wobble free. (In my defense, at this stage the shells are hardening but are still soft enough where a fall might bruise enough to allow rot to set in.)
Anyhow, they’ve made themselves all comfortable now; when I came back out and they’d moved up onto the chairs and the little ones were even up on the table.


There are several that are still too green to cut; there are maybe 45 on the porch and another dozen or two on the vine. I’ll have ample stock to make bug-eater birdhouses for next season. Now, what to do the with the other 40……
Where the h*ll is fall anyway?
Whine mode /ON
The weather forecast for the coming week is more of the same –
1. dry
2. dry
3. hot
4. more dry
It has been almost a month since it has rained here and even the crabgrass is dying.
Whine mode /OFF
The real subject of this post:
Over the past few days I’ve continued with the transition to the fall/winter garden even though it still feels like July here.
The last of the Henderson bush limas are pulled; these are a “baby lima” that put out three flushes of beans this summer. Each harvest was a little less than the previous, but since I didn’t need the space I just left them in the ground and they produced.
This little patch is picked & pulled with the ground ready for winter greens (it was the only thing I grew this year that wasn’t in a raised bed. It is over where a compost pile had been before the nuke hit the back 40). Yes, those are dried pods I missed along the way due to generally slack picking detail. Maybe I should teach Mrs cohutt how to pick beans next year, although I’d hate her to give up shelling duties.

As long as I’m on the topic of beans:
The “King of the Garden” and Christmas” “pole” limas put out a flush of blooms a few weeks ago when the nights started cooling off some again. The pods are now coming in and I harvested a few tonight; the August heat stifled production for the most part and I was beginning to wonder if they’d bounce back.

The bamboo trellis that I put up for these beans last spring is pretty well covered now (to say the least.) That’s it beyond the asparagus; this is the view of the end and you can’t really see the depth (8′) of the thing. Picture it as having a “W” on each end with trellis netting stretched between them.

That’s about all for now. Maybe tomorrow I’ll post about the gourd army assembling on Lizzie’s porch or the fantastically successful carrot germination experiment.
Gourd Vines vs Drought
In this match up the smart money bets on “drought”.
The last time I provided a gourd update (in the uncleverly titled gourd post of August 23rd), it appeared that the withering vines were making a come back.
Perhaps they were; the late summer thunderstorms had been moderately generous to them up until then but the last measurable rainfall I’ve seen was back on August 27th. I’ve watered a little since then but the heat and dry conditions have taken their toll.
The vines on the tower base were quite lush back on the 23rd; not so anymore.
As you can see, the “green is gone” in the background of the picture. The beds in the front were mostly the caged tomato ; now they are planted for fall with cole crops and spinach seeds (under the landscape fabric.)

And the corner of the tower base in the right side:

Likewise the late vine that had neatly covered the junk wire fencing (stashed next to the back gate for a trip to the scrap yard) had retreated. The gourds that had been growing under the leaves now appear to have been left high and dry when flood waters receded.
The season is coming to a close and I think we have all the gourds I am going to have this year. I think I’m going to leave most of them on the vine to dry; in a couple more weeks I should be able to easily see the whole inventory and will provide a report.
Colors
Napoleon sweet bell pepper
Sheepnose pimento pepper
Poblano pepper (ancho chile)
Brandywine tomato
cheap broken green hanging fern pot

Soil Cube: Garden tool of the day
Somewhere along the way this season I read about “soil cubes” for seed starting and the concept appealed to me. An “invisible pot” to start seeds in…..
I came across this soil cube tool at http://www.soilcube.com/ . Clayton came up with the design and makes/markets these at a very reasonable price vs others I had seen. I found him through Jack Spirko’s The SurvivalPodcast members support brigade section, where it is offered with a modest discount.
So what is it?
This little device spits out two 2″x2″ cubes of compacted soil mix with a small seed reservoir on top. It comes with instructions (read them before you try it and you’ll save yourself a little of the learning curve 😉 Duh.)
This is it- pretty simple. The wooden “tongs” are included as well; they are handy for moving the cubes without damaging them,

The nut that holds the “plunger” bolts to the frame provide the relief needed to make the seed reservoir.

Does it work? Absolutely, provided you read the tips and tricks first you won’t have any issues after the first couple of sacrificial attempts.
Here are some freshly made cubes sitting in a high-tech seed starting tray (a scavenged Chic-fil-A chicken nugget tray that comes with a convenient clear plastic cover).

An earlier tray has a young crop of lettuce seedlings a couple of weeks away from being moved outside. This is good, since the temperatures have been so high so far this September and my direct sown seeds are having germination issues as a result.

I think I’m going to like this tool; the cubes offer a lot of advantages over both peat pots and the trays, especially with plants that are traditionally poor “transplanters”.
The Soilcube website has much more information including a video demonstration on exactly how it works.
Clayton was in the process of moving when I ordered and my order was delayed a bit. Nothing too bad; he emailed me to apologize for the delay and when the package arrived, it included a second soilcube tool to make up for it. It wasn’t necessary but a nice touch just the same.
My only advice for Clayton would be to invest in a wood burning metal stamp of some sort to permanently put the name on the tool; the printer label dissolved pretty quickly with all the rinsing. (I couldn’t recall the exact name of the tool or website when I started this post and had to pull it back up via the email mentioned above. ) This seems like it will turn out to be a useful tool that I’ll recommend and having the name on it would make that easier for forgetful old guys like me.
Wellhouse (again)
(Note: I’m tired and proofing this post was making me cross eyed; so I said the hell with it and am about to press submit, typos and all).
More guerrilla construction this weekend; yesterday I packed my tools and materials up and did another 24 session on the wellhouse project. It was pleasant (roughly 82 was the high and 48 was the low) and crystal clear so I can’t really complain……
You may recall the tarp-fronted structure I posted pictures of after the initial construction weekend 6 weeks ago:

Since then I’ve done some shoring up of the foundation and clean up of the electrical; this weekend I had to re-engineer & reconnect the backwash drain we broke during the demolition, finish framing the front, build a door and put up the last 2 pieces of hardie board siding on the front.
First, the drain. I had just enough odd pieces of PVC to fashion a drain out under the front foundation. Part of the “re-engineering” would be to create some system that wouldn’t freeze when the system back-washes in the dead of winter; also I wanted to be able to run the hose out through the same brain if needed.
The pic below shows the drain end coming out from under the reinforced foundation on to a concrete based spillway. I covered the spillway with a piece of scrap corrugated drain pipe I had cut in half lengthwise then back filled over it. This should do the trick.

The pic below shows the beginning of the door framing in the front- not much appears to be done at this point but progress was being made.

I could find a satisfactory door short enough to fit into the front so I ended up making one- this will be a pain but a LOT cheaper than having a custom one made. I used 2×6 T&G yellow pine for the front and glued/screwed it to a scrap piece of 5/8″ plywood leftover from the roof decking. Hopefully this is warp resistant if not warp-proof; it was a pain to put together but the design should be satisfactory for this purpose. (And it should look good too).

Finally it was time to cut and hang the front siding; this wasn’t easy due to the weight of the concrete based board. It is up, although I ran out of time and materials to properly frame and hang to door. In the meantime I made a pendulum door out of the pieces i removed for the very rough cut door opening; this is nothing more than a temporary critter/weather block. Note this small opening was just to have access into the well house until the permanent door is finished and hung; I’ll cut the finished door opening from the inside using a reciprocating saw when the door is ready to go up. It is easy to cut more material off but impossible to put it back once cut, hence the conservative opening.

You may have noticed the spots all over the front siding; this was due to it laying out under the trees for 5 weeks waiting to be hung. All sorts of critters can move in under any construction material left out in the mountains; before I started handling the materials I used a crowbar to lift and move it to give any copperheads a chance to “not bite me”.
There weren’t any copperheads this time (thankfully) but I’m still glad i was cautious; the poor picture quality doesn’t do the Black Widow below justice. (She was under the siding; I think I’d rather be bitten by a copperhead than one of these.)

That will leave a mark
Fair warning:
Don’t click the thumbs below if you are squeamish. It isn’t as gross as squash vine borers or anything but still…..
Yesterday evening, my foot slipped and a blunt piece of metal pressed hard against the inside of my shinbone. In a second there was clean cut like a razor sliced me.
Ouch.
Is that a tendon I see?
Ouch again.
All is well though; the wound is properly taken care of, bound up and hopefully on its way to a full recovery.
Carrots and lettuce seed planting has to wait until this evening.